基于QMP实现对qemu虚拟机进行交互 + telnet |
您所在的位置:网站首页 › qemu monitor › 基于QMP实现对qemu虚拟机进行交互 + telnet |
基于QMP实现对qemu虚拟机进行交互 + telnet
|
https://cloud.tencent.com/developer/article/1468105
qemu) "ctrl+]" to return to telnet, (qemu)"quit" to exit qemu applicatoin.
通过网络连接到QEMU MONITO http://smilejay.com/2014/01/access-qemu-monitor-accross-network/ qemu-system-aarch64 -name vm2 -daemonize \ -enable-kvm -M virt -cpu host -smp 2 -m 4096 \ -object memory-backend-file,id=mem,size=4096M,mem-path=/mnt/huge,share=on \ -numa node,memdev=mem -mem-prealloc \ -global virtio-blk-device.scsi=off \ -device virtio-scsi-device,id=scsi \ -kernel vmlinuz-4.18 --append "console=ttyAMA0 root=UUID=6a09973e-e8fd-4a6d-a8c0-1deb9556f477 iommu=pt intel_iommu=on iommu.passthrough=1" \ -initrd initramfs-4.18 \ -drive file=vhuser-test1.qcow2 \ -device vfio-pci,host=0000:05:00.0 \ -net nic,macaddr=00:00:00:99:99:01 \ -monitor telnet:localhost:4321,server,nowait\ -vnc :10
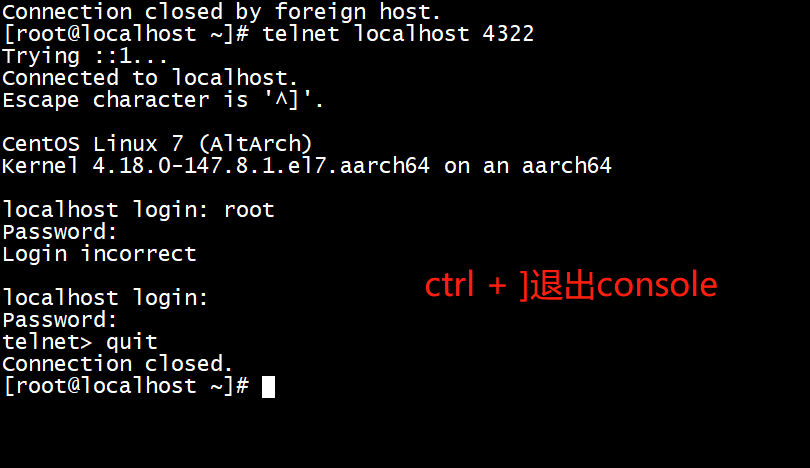
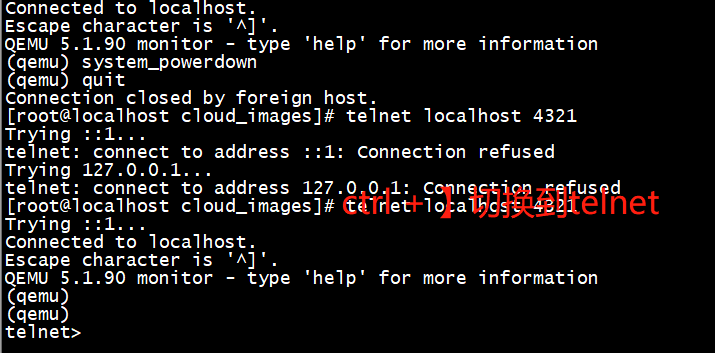
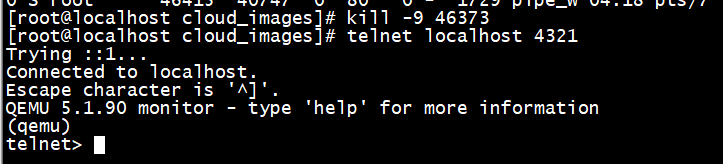
system_powerdown不能关机,quit可以关机 [root@localhost cloud_images]# telnet localhost 4321 Trying ::1... Connected to localhost. Escape character is '^]'. QEMU 5.1.90 monitor - type 'help' for more information (qemu) system_powerdown (qemu) quit Connection closed by foreign host. [root@localhost cloud_images]#
关机命令 { "execute": "stop" } [root@localhost cloud_images]# telnet 127.0.0.1 4444Trying 127.0.0.1...Connected to 127.0.0.1.Escape character is '^]'.{"QMP": {"version": {"qemu": {"micro": 90, "minor": 1, "major": 5}, "package": "v5.2.0-rc0-dirty"}, "capabilities": ["oob"]}}ifo^H^H{"error": {"class": "GenericError", "desc": "JSON parse error, invalid keyword 'ifo'"}}{"error": {"class": "GenericError", "desc": "JSON parse error, stray '\b'"}}{"error": {"class": "GenericError", "desc": "JSON parse error, stray '\b'"}}info{"error": {"class": "GenericError", "desc": "JSON parse error, invalid keyword 'info'"}} qmp_system_powerdown{"error": {"class": "GenericError", "desc": "JSON parse error, invalid keyword 'qmp'"}}{"error": {"class": "GenericError", "desc": "JSON parse error, stray '_'"}} ^]telnet> ^]telnet> qmp_system_powerdown ?Invalid commandtelnet> ^[[A^H^H?Invalid commandtelnet> shutdown?Invalid commandtelnet> powerwo^H^H?Invalid commandtelnet> powerdown?Invalid commandtelnet> quitConnection closed.[root@localhost cloud_images]# telnet 127.0.0.1 4444Trying 127.0.0.1...Connected to 127.0.0.1.Escape character is '^]'.{"QMP": {"version": {"qemu": {"micro": 90, "minor": 1, "major": 5}, "package": "v5.2.0-rc0-dirty"}, "capabilities": ["oob"]}}{ "execute": "stop" }Connection closed by foreign host.[root@localhost cloud_images]#
[root@localhost binary]# nc -U qmp.sock{"QMP": {"version": {"qemu": {"micro": 90, "minor": 1, "major": 5}, "package": "v5.2.0-rc0-dirty"}, "capabilities": ["oob"]}}{ "execute": "stop" }Ncat: Connection reset by peer.[root@localhost binary]#
1. QEMU monitor支持远程telnet访问: 1 [root@kvm-host ~]# qemu-system-x86_64 -enable-kvm -smp 2 -m 1024 vm2.img -monitor telnet:10.1.77.82:4444,server,nowait
关于这里-monitor的选项,做如下说明: 1 2 3 4 5 6 tcp – raw tcp sockets #下面第2点,我的举例是RAW TCP socket telnet – the telnet protocol is used instead of raw tcp sockets. This is the preferred option over tcp as you can break out of the monitor using Ctrl-] then typing quit. You can’t break out of the monitor like this after connecting with the raw socket option 10.1.77.82 – Listen on this host/IP only. You can use 127.0.0.1 if you want to only allow connections locally. If you want to listen on any ip address on the server, just leave this blank so you end up with two consecutive colons ie “::” . 4444 – port number to listen on. server – listening in server mode nowait – qemu will wait for a client socket application to connect to the port before continuing unless this option is used. In most cases you’ll want to use the nowait option.通过telnet连接到远程的QEMU monitor上: 1 2 3 4 5 6 7 8 9 10 11 12 13 14 15 16 jay@jay-linux:~$ telnet 10.1.77.82 4444 Trying 10.1.77.82... Connected to 10.1.77.82. Escape character is '^]'. QEMU 1.7.50 monitor - type 'help' for more information (qemu) info kvm kvm support: enabled (qemu) info status VM status: running (qemu) help migrate migrate [-d] [-b] [-i] uri -- migrate to URI (using -d to not wait for completion) -b for migration without shared storage with full copy of disk -i for migration without shared storage with incremental copy of disk (base image shared between src and destination) (qemu) ctrl + ] (断掉telnet连接) telnet> quit (退出telnet) Connection closed.
2. QEMU monitor支持RAW socket的远程访问: 1 [root@kvm-host ~]# qemu-system-x86_64 -enable-kvm -smp 2 -m 1024 vm2.img -monitor tcp:10.1.77.82:4444,server,nowait
可以使用netcat去连接这个socket: 1 2 3 4 5 6 jay@jay-linux:~$ nc 10.1.77.82 4444 QEMU 1.7.50 monitor - type 'help' for more information (qemu) info kvm info kvm kvm support: enabled (qemu) ^C QMP介绍qemu对外提供了一个socket接口,称为qemu monitor,通过该接口,可以对虚拟机实例的整个生命周期进行管理,主要有如下功能 ▷ 状态查看、变更 ▷ 设备查看、变更 ▷ 性能查看、限制 ▷ 在线迁移 ▷ 数据备份 ▷ 访问内部操作系统 通过该socket接口传递交互的协议是qmp,全称是qemu monitor protocol,这是基于json格式的协议 在继续往下讲之前,需要先了解qemu、kvm、libvirt之间的区别(因为有很多童鞋对这三者的理解是混乱的) ▷ qemu:虚拟机仿真器。通过软件模拟出cpu、内存、磁盘、主板、网卡等设备 ▷ kvm:高性能的cpu仿真器。由于软件模拟的cpu性能很差,因此出现了kvm,这是通过硬件与内核的支持实现接近native性能的cpu仿真器,可以理解为虚拟机里的cpu任务直接交给物理机cpu完成。 ▷ libvirt:虚拟机管理平台。能纳管qemu、lxc、esx等虚拟化软件,通过编写xml实现对虚拟机、存储、网络等进行配置和管理 单独使用qemu,启用QMP启动qemu虚拟机 # qemu monitor采用tcp方式,监听在127.0.0.1上,端口为4444 /usr/libexec/qemu-kvm -qmp tcp:127.0.0.1:4444,server,nowait # qemu monitor采用unix socket,socket文件生成于/opt/qmp.socket /usr/libexec/qemu-kvm -qmp unix:/opt/qmp.socket,server,nowait连接qemu monitor # tcp可以通过telnet进行连接,方法如下 > telnet 127.0.0.1 4444 Trying 127.0.0.1... Connected to 127.0.0.1. Escape character is '^]'. {"QMP": {"version": {"qemu": {"micro": 0, "minor": 12, "major": 2}, "package": "qemu-kvm-ev-2.12.0-18.el7_6.1.1"}, "capabilities": []}} # unix socket可以通过nc -U进行连接,方法如下 > nc -U qmp.socket {"QMP": {"version": {"qemu": {"micro": 0, "minor": 12, "major": 2}, "package": "qemu-kvm-ev-2.12.0-18.el7_6.1.1"}, "capabilities": []}}按照上面执行完命令后,不会退出而是继续等待输入,但这个时候还无法使用,接着,需要输入一条qmp指令才可以 { "execute" : "qmp_capabilities" }此时屏幕会输出以下内容,表示从"capabilities negotiation模式"进入了"command"模式 {"return": {}}接下来,就可以执行qmp的指令了,qmp指令非常多,由于篇幅有限,这里仅举几个例子(更多内容请参考官方文档,本文最后附上网址) # 查看支持哪些qmp指令 { "execute": "query-commands" } # 虚拟机状态 { "execute": "query-status" } # 虚拟机暂停 { "execute": "stop" } # 磁盘查看 { "execute": "query-block" } # 磁盘在线插入 { "execute": "blockdev-add", "arguments": { "driver": "qcow2", "node-name": "drive-virtio-disk1", "file": { "driver": "file", "filename": "/opt/data.qcow2" } } } { "execute": "device_add", "arguments": { "driver": "virtio-blk-pci", "drive": "drive-virtio-disk1" } } # 磁盘完整备份 { "execute" : "drive-backup" , "arguments" : { "device" : "drive-virtio-disk0" , "sync" : "full" , "target" : "/opt/backuptest/fullbackup.img" } }进入command模式后,不仅能够执行命令,还同时成为了事件的输出端口,比如执行磁盘备份命令后,应该就会陆续接收到一些关于备份成功或失败的事件,比如: { "execute" : "drive-backup" , "arguments" : { "device" : "drive-virtio-disk0" , "sync" : "top" ,"target" : "/opt/ccvm/A" } } {"timestamp": {"seconds": 1551061368, "microseconds": 725212}, "event": "JOB_STATUS_CHANGE", "data": {"status": "created", "id": "drive-virtio-disk0"}} {"timestamp": {"seconds": 1551061368, "microseconds": 725330}, "event": "JOB_STATUS_CHANGE", "data": {"status": "running", "id": "drive-virtio-disk0"}} {"return": {}} {"timestamp": {"seconds": 1551061373, "microseconds": 276382}, "event": "JOB_STATUS_CHANGE", "data": {"status": "waiting", "id": "drive-virtio-disk0"}} {"timestamp": {"seconds": 1551061373, "microseconds": 276462}, "event": "JOB_STATUS_CHANGE", "data": {"status": "pending", "id": "drive-virtio-disk0"}} {"timestamp": {"seconds": 1551061373, "microseconds": 276508}, "event": "BLOCK_JOB_COMPLETED", "data": {"device": "drive-virtio-disk0", "len": 21474836480, "offset": 11141120, "speed": 0, "type": "backup"}} {"timestamp": {"seconds": 1551061373, "microseconds": 276551}, "event": "JOB_STATUS_CHANGE", "data": {"status": "concluded", "id": "drive-virtio-disk0"}} {"timestamp": {"seconds": 1551061373, "microseconds": 276583}, "event": "JOB_STATUS_CHANGE", "data": {"status": "null", "id": "drive-virtio-disk0"}}上面第一行是执行命令,接下来的就是陆续接收到的事件,这与linux的tty终端很像 接收到的事件不仅是本窗口命令执行的相关事件,而是会收到所有qmp事件,比如开了多个qmp监听器,那么只要监听器进入command模式,就都会同时接收到事件(下面还提到了libvirt启动qmp,也是一样的效果) 除了使用telnet、nc从外部连接,还可以在qemu启动时候进入一个交互的cli界面,直接输入指令,只不过这个时候输入的是hmp(human monitor protocol),而不是qmp。hmp简化了qmp的使用,但实际在底层依然是转化为qmp进行操作的,配置方法如下 /usr/libexec/qemu-kvm -qmp tcp:127.0.0.1:4444,server,nowait -monitor stdio此时会出现交互界面,输入help,就可以看到hmp支持的所有命令 (qemu) help使用hmp不需要输入类似qmp的{ "execute" : "qmp_capabilities" } 这里列出几个范例 # 直接输入info回车,可以看到所有查询类的指令使用方法 (qemu) info # 查看块设备 (qemu) info block # 在线增加磁盘 (qemu) drive_add 0 file=/opt/data.qcow2,format=qcow2,id=drive-virtio-disk1,if=none (qemu) device_add virtio-blk-pci,scsi=off,drive=drive-virtio-disk1还有一种脱裤子放屁的hmp写法,是将hmp套在qmp里, { "execute" : "human-monitor-command", "arguments" : { "command-line" : "这里写hmp语法" } }比如 { "execute" : "human-monitor-command", "arguments" : { "command-line" : "drive_add -n buddy driver=replication,mode=primary,file.driver=nbd,file.host=xxxx,file.port=xxxx,file.export=colo1,node-name=nbd_client1" } }
|

【本文地址】